Stands.
Stands are an important part of a ship in the bottle, and all three – the stand, the cork and the ship - should make a single whole and supplement each other. As a rule, the type of a ship and the shape of the bottle define the form of a stand.
Every boat model maker makes it in a different way, that’s why I will only give you some advice without giving you ready solutions.
First, fix securely the bottle on the stand; it will enable you to keep the bottle in good shape for years. Otherwise, the ship may slide off the stand and break into pieces; to avoid that , make sure it’s fixed well. However, don’t glue the bottle to the stand; just tie it with a nice thread or a piece of old-looking copper wire. For instance, you can make miniature shrouds with tiny dead eyes.
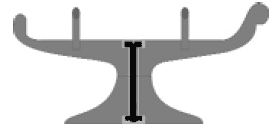
Then you need to lift the model of a ship in the bottle above the base of the stand to make it “soar in the air”. To reach that effect, you have to attach the frame (on which the bottle rests) to the base of the stand only in one or two spots and then lift it as high as possible. Such a structure will be stable enough if you tighten the joint with a screw bolt and a nut (pic. 63).
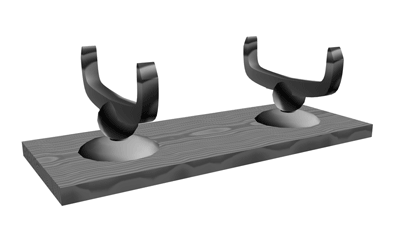
The base of the stand can be made of a thick board or turned with a turning machine (pic. 64). You can use beech wood, maple wood or red wood. It’s better to make the cork of the same material.
How to Choose a Bottle.
First of all, a model should fit inside a bottle. Moreover, a narrow and long neck will only complicate your work, especially if you are a beginner.
Furthermore, c hoose a transparent bottle whose glass doesn’t have any ripple on the surface since it will hide the model. That’s why the glass should be thin and clear; however, any glass distorts objects (you can easily see it if you insert a checked piece of paper into a bottle), so try to find a bottle with minimum distortion.
I need to say that there are no unimportant details when you work on a model; you will achieve success only with lots of patience and scrupulosity.
How to choose a drawing to make a ship model in a bottle.
Before choosing a master drawing for your work, you have to decide whether you want to make just a souvenir or a miniature copy of a real ship. For the former any picture or photo of a sail ship will be enough; you can even draw it yourself. Don’t get upset in ca se it does not look “very real”; you are the author and you make it look like you wish. A ship in the bottle can look wonderful even if it exists only in your imagination.
For a beginner I’d recommend a simple sail ship with fore-and-aft sails and one or two masts. For example, a schooner (pic. 61); it is easy to make and insert inside a bottle.

If yo u are a skillful maker, you’re less likely to be satisfied with an uncomplicated model, so you can try to create a copy of a real vessel. At least you should try to make it look like a miniature copy. A ready model will fit into your palm. How precise and detailed can be the parts of the ship in miniature scale? All depends only on your skills. Sometimes details can be reproduced on a scale of 1:500 as accurately as on a scale of 1:100.
The more exact drawing you get, the easier your work will be. At times a very detailed drawing makes a maker to reproduce details that are not seen with a naked eye; it is not a reason to blame him or her. Visa versa, if a part is not visible, the whole charm and the fineness of the performance will only benefit from it.
Before starting to work with your model, choose a scale of it; measure the bottle thoroughly – its depth, length and height. Measure the maximum dimensions of the future model, compare them with those on the drawing and calculate the scale.
Make a scale table. For instance, the length of the body of the future model is 100 mm and the length of that on the drawing is 250 mm. Divide 250 by 100 and you will get a conversion rate of 2,5. To draw up a table, you need to divide the figures from 1 to 9 by the conversion rate. In our case we get the following table:
How to use it? For example, a detail size on the drawing is 32 mm. Factorize it into summands 30 and 2. In our table “3” on the drawing corresponds to 1,2 on the model. Because we don’t have 3, but 30, multiply 1,2 by 10 and you’ll get 12. Again, “2” corresponds to 0,8 in the table. Add 12 to 0,8, and you’ll get 12,8. It means that 32 mm on the drawing is 12,8 mm on the model.
Of course, you can use a calculator and every time divide a number on the drawing by 2 , 5, but believe me – the calculator is an unnecessary thing on your table. Calculate mentally is faster, and your brain will only benefit from it.
What kind of a ship can I recommend to a skillful model maker? First of all you need to choose a method of inserting the ship into a bottle since the complexity of design depends on a method. The main question you have to answer is into how many parts and in what plane you are ready to cut your ship. If you chose the most difficult way and decided to cut the ship vertically, then any kind – a sailing ship, battleship or papyrus boat – is suitable for you.
If you don’t want to use such a time-taking method and cut the body, choose a sailing ship. Why that one? Of course, it’s not forbidden to put a battleship or steamer inside, but without gorgeous sails they won’t look great. The body of a ship without sails should be very wide to make people see that it’s larger that the bottleneck.
The most complicated models are those with a sophisticated design and masts with sails. For example, such battleships built in the end of the 19 th -the beginning of the 20 th centuries (pic. 62)
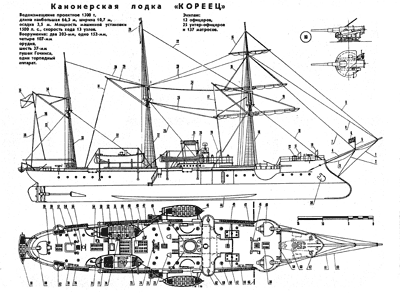

Table of contents:
- Ships in bottles. How to put a ship into a bottle?
- Method 1. Traditional.
- Method 2. Straws
- Method 3. Without a joint
- Method 4. A Joke?
- Method 5. Great potential
- Instruments
- Handy hints and tips for boat model makers
- Incredible Corks
- Unusual ship models in bottles.
- Stands, drawing and bottles