Method 1. Traditional.
This method is the most widespread among ship models masters; it does not require complicated instruments and skills. The only thing you will need is patience and carefulness. The best way to start is to make a body – it is made of wood, then painted in a desired color and after that a mast, spars, rigging and other details should be installed. Do not be frightened: all those details are assembled on the table, not inside the bottle. You only need to make sure that the construction will go through the bottle neck easily.
Making a body is a very important part of your work. In spite of the fact that the body should be narrower than it is shown on your drawing (to make it easy to insert it into a bottle), the rest of the parts should be possibly made according to the drawing. Only following these instructions you can make a good model.
Now let us proceed to the masts because they contain the very secret of the work. They have a tiny joint in the base which allow them to bend easily along the body of the ship. There exist a lot of joint types but before choosing one try to invent your own. You might contrive something special – a thin spring, a plastic tube or something else can become a joint, too. (pict. 3)
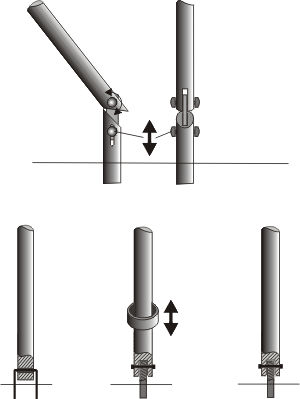
The only thing you need to remember about is that the joint should be as less noticeable as possible, that is why you need to find a way to make that joint hidden. You can paint both the joint and the mast in dark color or put a piece of tube on the mast which will cover the joint when the mast is in vertical position, and there is a lot of other ways to do that.
After installing the masts the shrouds and backstays are installed. Now you can see that a ship with the masts folded down can be easily inserted into the bottle. However, if you fix the stays hard, it will prevent the masts to fold back. To avoid that, the bottom of the stays should not be glued completely or cut but should be left long and after being run through a special opening (on the bowsprit or deck) should be taken outside the bottle.
Of course, the stays should be long enough to make the masts vertical (pic. 4). These strings will be cut off at the end of the work, but before that you need to fix them with a bit of glue.
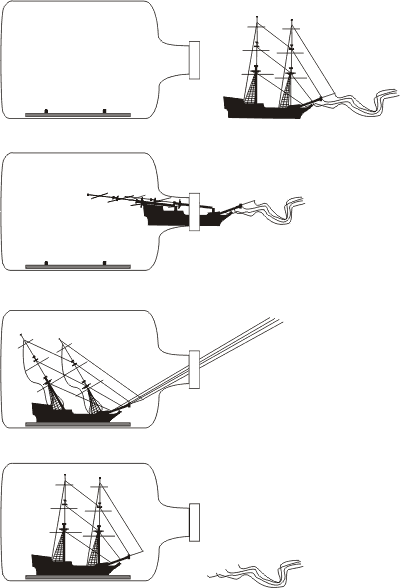
Do not forget about the sails, and before putting the ship into the bottle you need to attach them as well as the yard, brace, sheet and the rest of the running rigging. As a beginner, you can choose a simple schooner with fore-and-aft sails for your first work. Then installing of the sails and assembling of the ship inside the bottle will not cause any difficulties. Sailing ships with a large number of goosewing (square-rigged ship) may be more complicated to make. In this case you should probably use the method described above: run some details of the running rigging through an opening in the body and pull them out (the described method of assembling a ship inside the bottle works here as well).
After all the ropes are drawn and fixed with glue, the unnecessary threads should be cut off.
The model is almost ready. We only need to mention how to attach a ship inside the bottle. Most masters like making a model of sea surface inside by pouring colored epoxy resin or imitate waves using various plastic materials. Such a “sea” allows you to make the body of the ship only up to the waterline which makes its measurements smaller and makes the penetration into the bottle easier.
However, when building a ship model, especially a modern one, it is important to display the bottom of it. You need to put the ship onto a stand glued to the inside part of the bottle. The simplest way to do that is to use a small wooden board with tiny pins for fixing the ship.
As you can see , the secret turned out to be quite simple. Now let us assess advantages and disadvantages of this method of assembling of a ship in a bottle. The major advantage is the simplicity – the model is assembled at the table which does not require complicated manipulations inside the bottle. However, it results in a few drawbacks. In fact, restrictions put on the width of the ship body can prevent you form building an exact model shown on your drawing since the body with the rigging should easily go through the neck of the bottle. Building a model with multiple sails and complicated construction of the body will not be simple either because the neck of a bottle is not wide enough. It is also impossible to make a body consisting of two or more parts. All that gives a lot of trouble though using the traditional method will help you make a good model.
Now I am going to tell you about the instrument with which we assemble a ship inside a bottle. I should warn you against using long tweezers (if you already have ones, hide it), or you will never overcome that psychological barrier and invent something new. You should not use an all-purpose tool either; for every action there should be a certain instrument.
If you decide t o use the method described above, you will need the simplest devices only. Let us enumerate steps to assemble a ship in the bottle. First of all, glue the stand to the glass. Then push the ship into the bottle, put it on the stand, straighten the sails and stretch the rigging. The last step will be to remove unnecessary threads. For each step you will need a separate instrument.
All of them you can easily make from umbrella spokes. To make a spatula for glue, just flatten and turn down the end of a spoke (pic. 5).

You can use a similar device to put a stand inside the bottle, but you need to make two holes in the spatula so that it will look like a crane. Make two holes in the stand as well to hang it up using a piece of fishing line. After installing it inside the bottle pull out the fishing line (pic. 6).
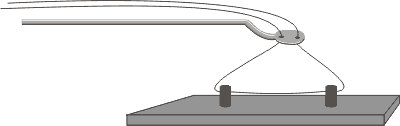
The next instrument will help you to do the most part of work inside the bottle. Sharpen and turn down one end of a spoke and attach a piece of flexible but firm wire to the other (pic. 7).

The last instrument will be used for cutting off unnecessary threads (pic. 8), attach a piece of wire and then a razor. Flexible wire allows you to change angles and cut off threads in hard-to-reach places. For attaching the razor you can use hot-melt adhesive glue. This glue melts fast when heated and becomes hard quickly when cooled down. Because of such properties of the glue you can replace blunt razor in seconds.

If you just start working on your model, it would be practical to use the above described instrument. And during your work you will improve it and get some new skills.
The first method of assembling of a ship in a bottle can be recommended for beginners while an experienced master will not find here anything new. Although I dare to believe that even a skilful person will get some interesting information after reading this book.
Table of contents:
- Ships in bottles. How to put a ship into a bottle?
- Method 1. Traditional.
- Method 2. Straws
- Method 3. Without a joint
- Method 4. A Joke?
- Method 5. Great potential
- Instruments
- Handy hints and tips for boat model makers
- Incredible Corks
- Unusual ship models in bottles.
- Stands, drawing and bottles